1. Quick start
Start with Position Path and build outward.
Fretwise Pro is designed around one main idea: learn a playable route first, then reinforce that route from several angles until the neck starts to feel connected rather than like a collection of separate boxes.
How to use it
- Install and open Fretwise Pro: The Path.
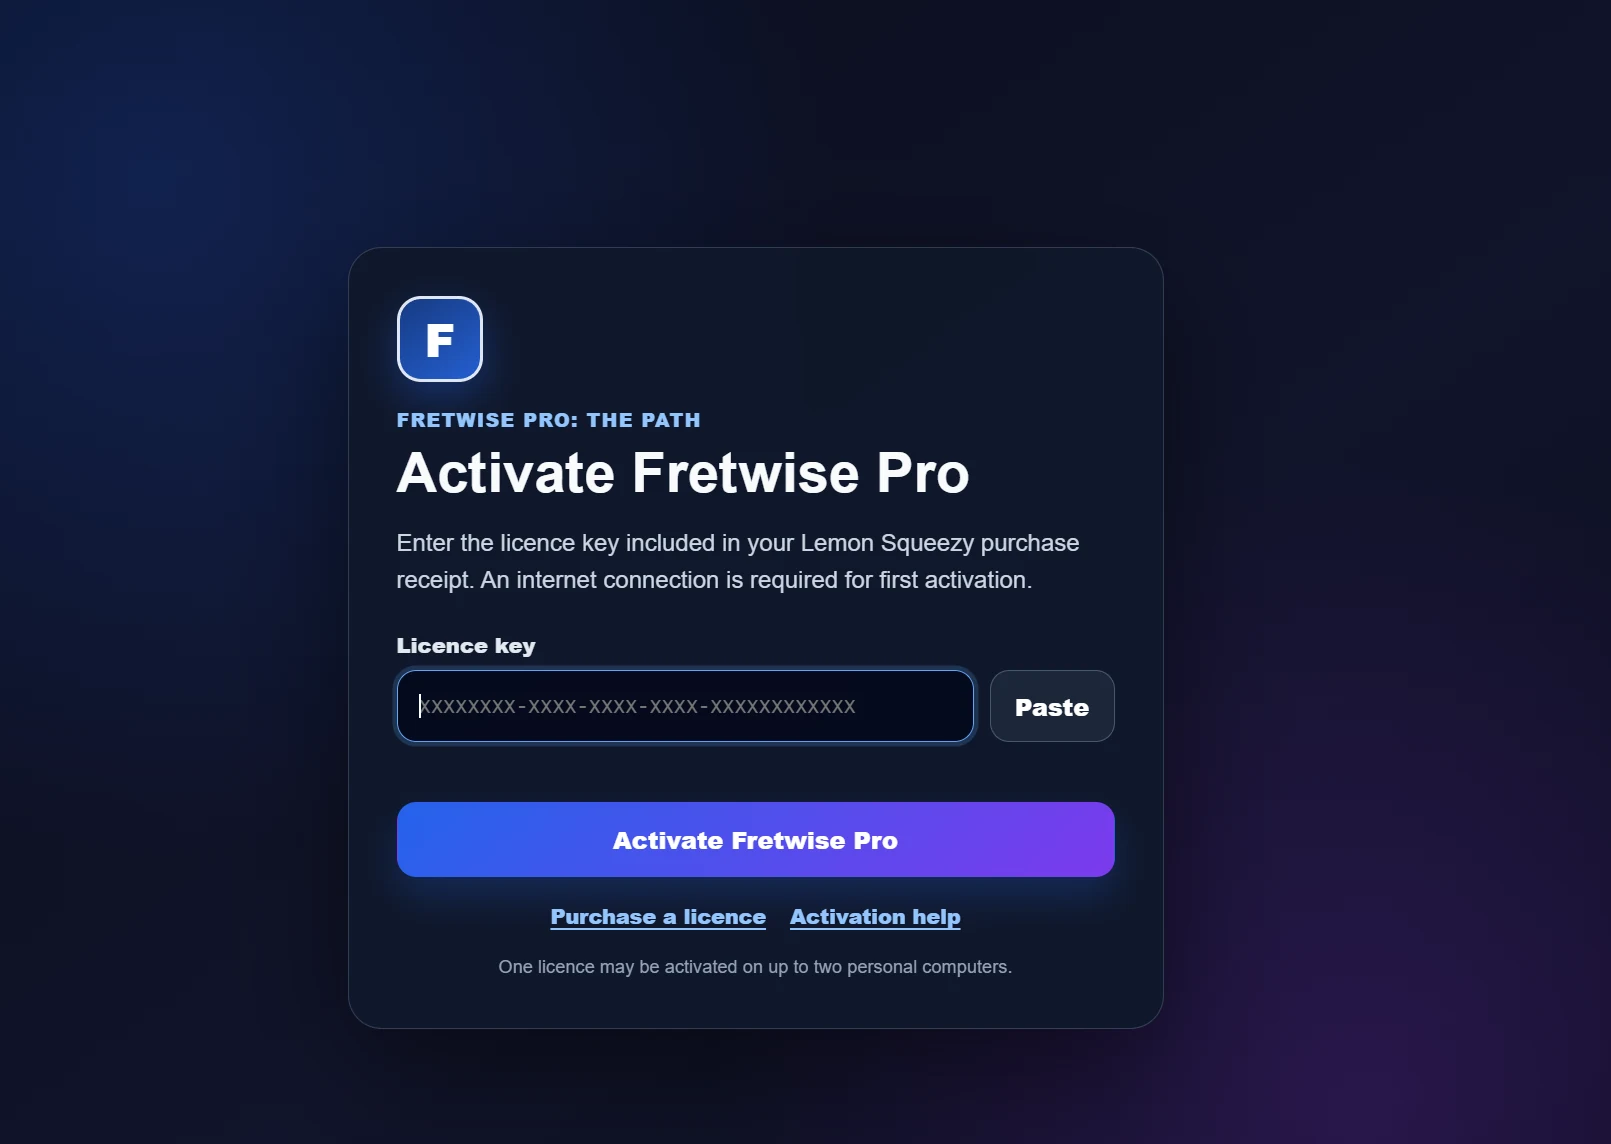
- Activate the app with the licence key from your Lemon Squeezy order if the activation screen appears.
- Choose Position Path and select a key, key type, fret range, string group, tuning, and direction.
- Review the suggested route and play the full route once so you can hear the movement.
- Use Practice Route to work through the route one chord at a time.
- When the route is familiar, use Triad Path, Progression Trainer, Route Drill, Ear Trainer, and Voice-Leading Trainer to reinforce the same fretboard knowledge from different angles.
2. Install and licence activation
Download, install, activate, and manage your two-computer licence.
Lemon Squeezy provides both Windows and Mac installers, your receipt, and one unique licence key after purchase. The licence can be active on up to two computers total in any combination of Windows and Mac.
How to use it
- Download the installer for your platform from your Lemon Squeezy order.
- Windows: run Fretwise-Pro-The-Path-Setup-1.0.0.exe. Mac: open Fretwise-Pro-The-Path-1.0.0-universal.dmg, drag Fretwise Pro - The Path to Applications, then open it from Applications.
- Open Fretwise Pro and paste the licence key into the activation screen.
- Select Activate Fretwise Pro.
- After activation, open the Licence panel at any time to validate the key or deactivate the current computer.
- Before replacing a computer, use Deactivate this computer so that activation is returned to your two-device allowance.
3. How the interface works
Use the Focus Neck for the current job and the Reference Neck for context.
Most modes share the same setup ideas, but the two-neck layout is what ties the app together.
What it does
Setup holds the musical and mode-specific controls. Focus Neck concentrates on what you should play now. Reference Neck shows the larger route, note map, or surrounding context.
What you learn
You learn to see a local shape without losing track of how it belongs to the rest of the neck.
Why it matters
Fretboard fluency comes from relating a small playable area to a larger musical map, not from memorizing isolated diagrams.
How to use it
- Use Setup to choose the mode, root, key type or scale, fret range, strings, tuning, Tone, and mode-specific options.
- Use Focus Neck when you need to concentrate on the current chord, shape, note set, or practice step.
- Use Reference Neck to keep the wider route or note context visible.
- Collapse Setup, Suggested Route, Practice Route, Route Map, or other panels when you need more room in a smaller window.
- Root, third, and fifth use distinct role colours. The active selection or practice step receives an additional highlight.
4. Position Path
Turn the seven chords of a key into one playable route.
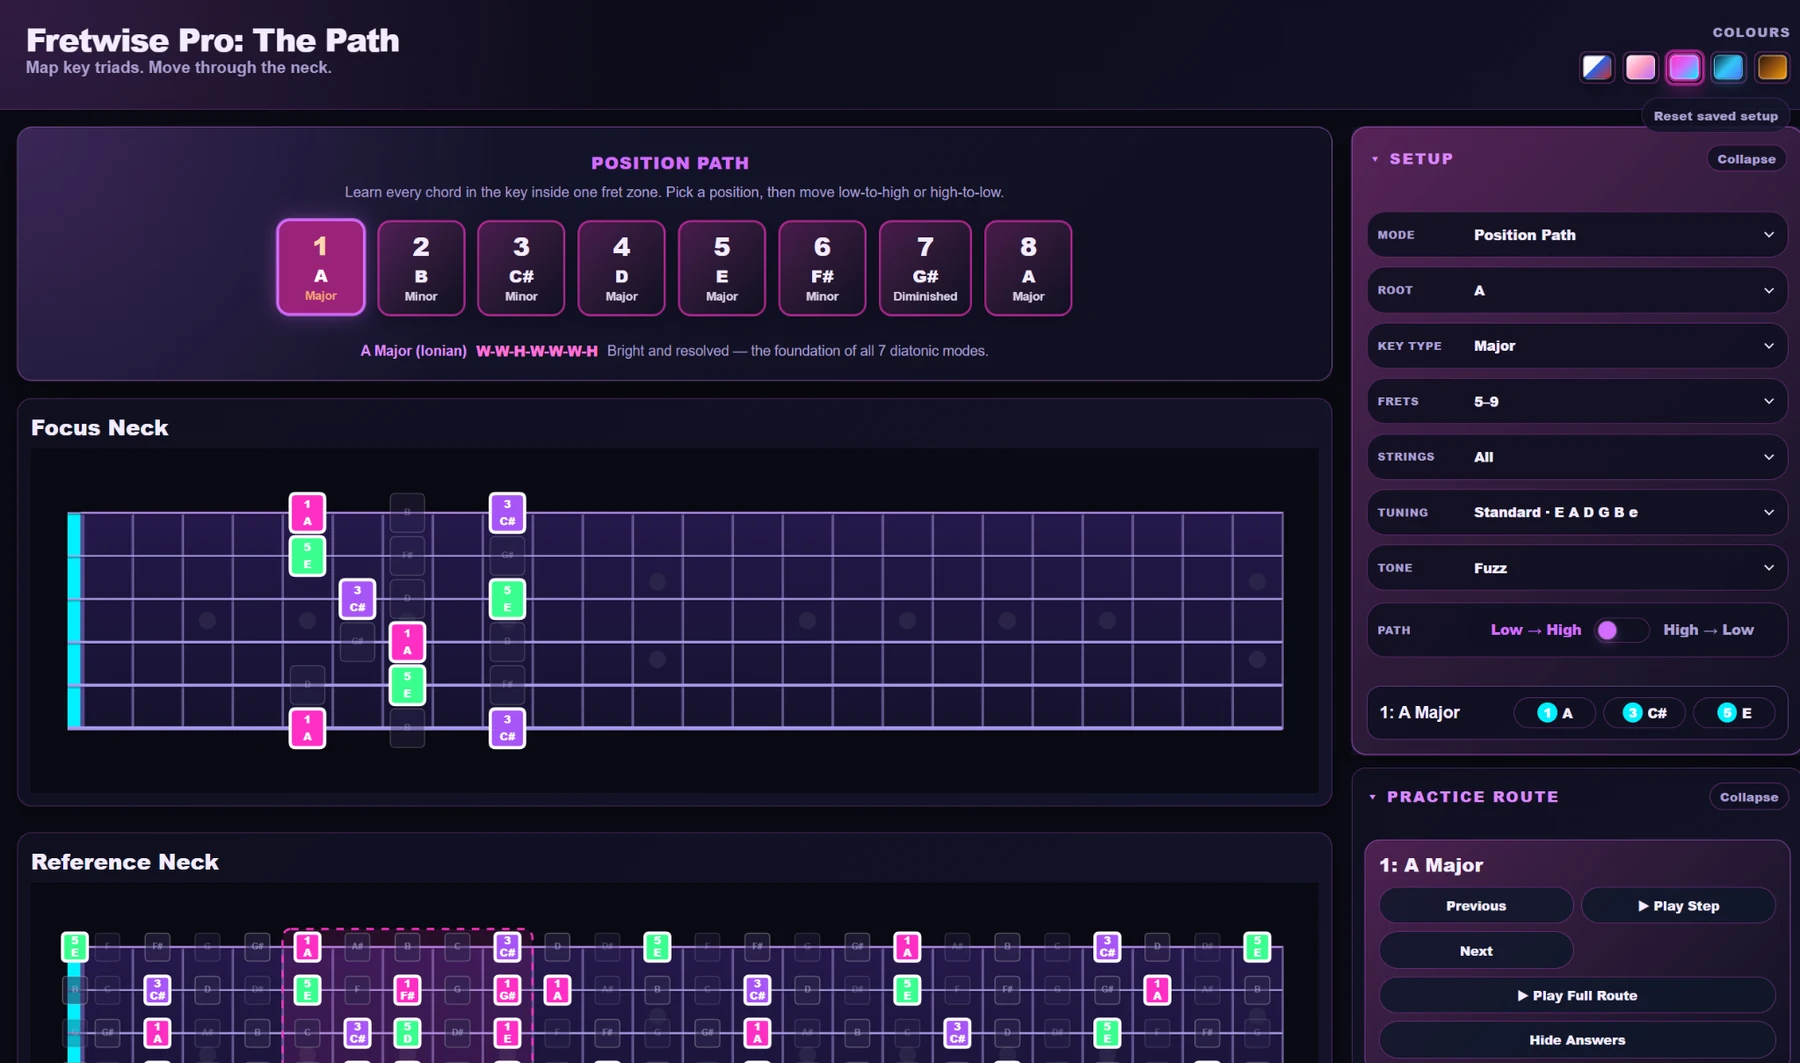
Position Path is the main Fretwise workflow. It chooses playable diatonic triads inside the neck area you select and organizes them into a practical route instead of leaving you to search the whole fretboard.
What it does
Builds a suggested route through the diatonic chords of the selected key and offers alternate Low, Middle, and High Position routes when they are available.
What you learn
Where each chord degree lives in a selected fret zone, how the inversions relate, and how the route changes when you move in the opposite pitch direction.
Why it matters
You stop treating every chord shape as a separate fact and start learning a repeatable path that you can actually play through a key.
How to use it
- Choose Position Path.
- Select the root, Major or Minor key type, fret range, string group, tuning, and Tone.
- Choose Low-to-High or High-to-Low. Low and High refer to pitch: Low-to-High moves generally from the nut toward higher frets, while High-to-Low reverses that traversal.
- Start with Suggested Route. Compare Low Position Route, Middle Position Route, and High Position Route when alternate routes are available.
- Select Play Full Route to hear the complete path. The active degree follows the playback.
- Use Practice Route to move through the route one step at a time. Focus Neck shows the active triad while Reference Neck keeps the full route visible.
- Click a degree tile when you want to hear that chord directly, and use Hide Answers when you want to test recall.
5. Triad Path
Learn one chord function in several inversions and registers.
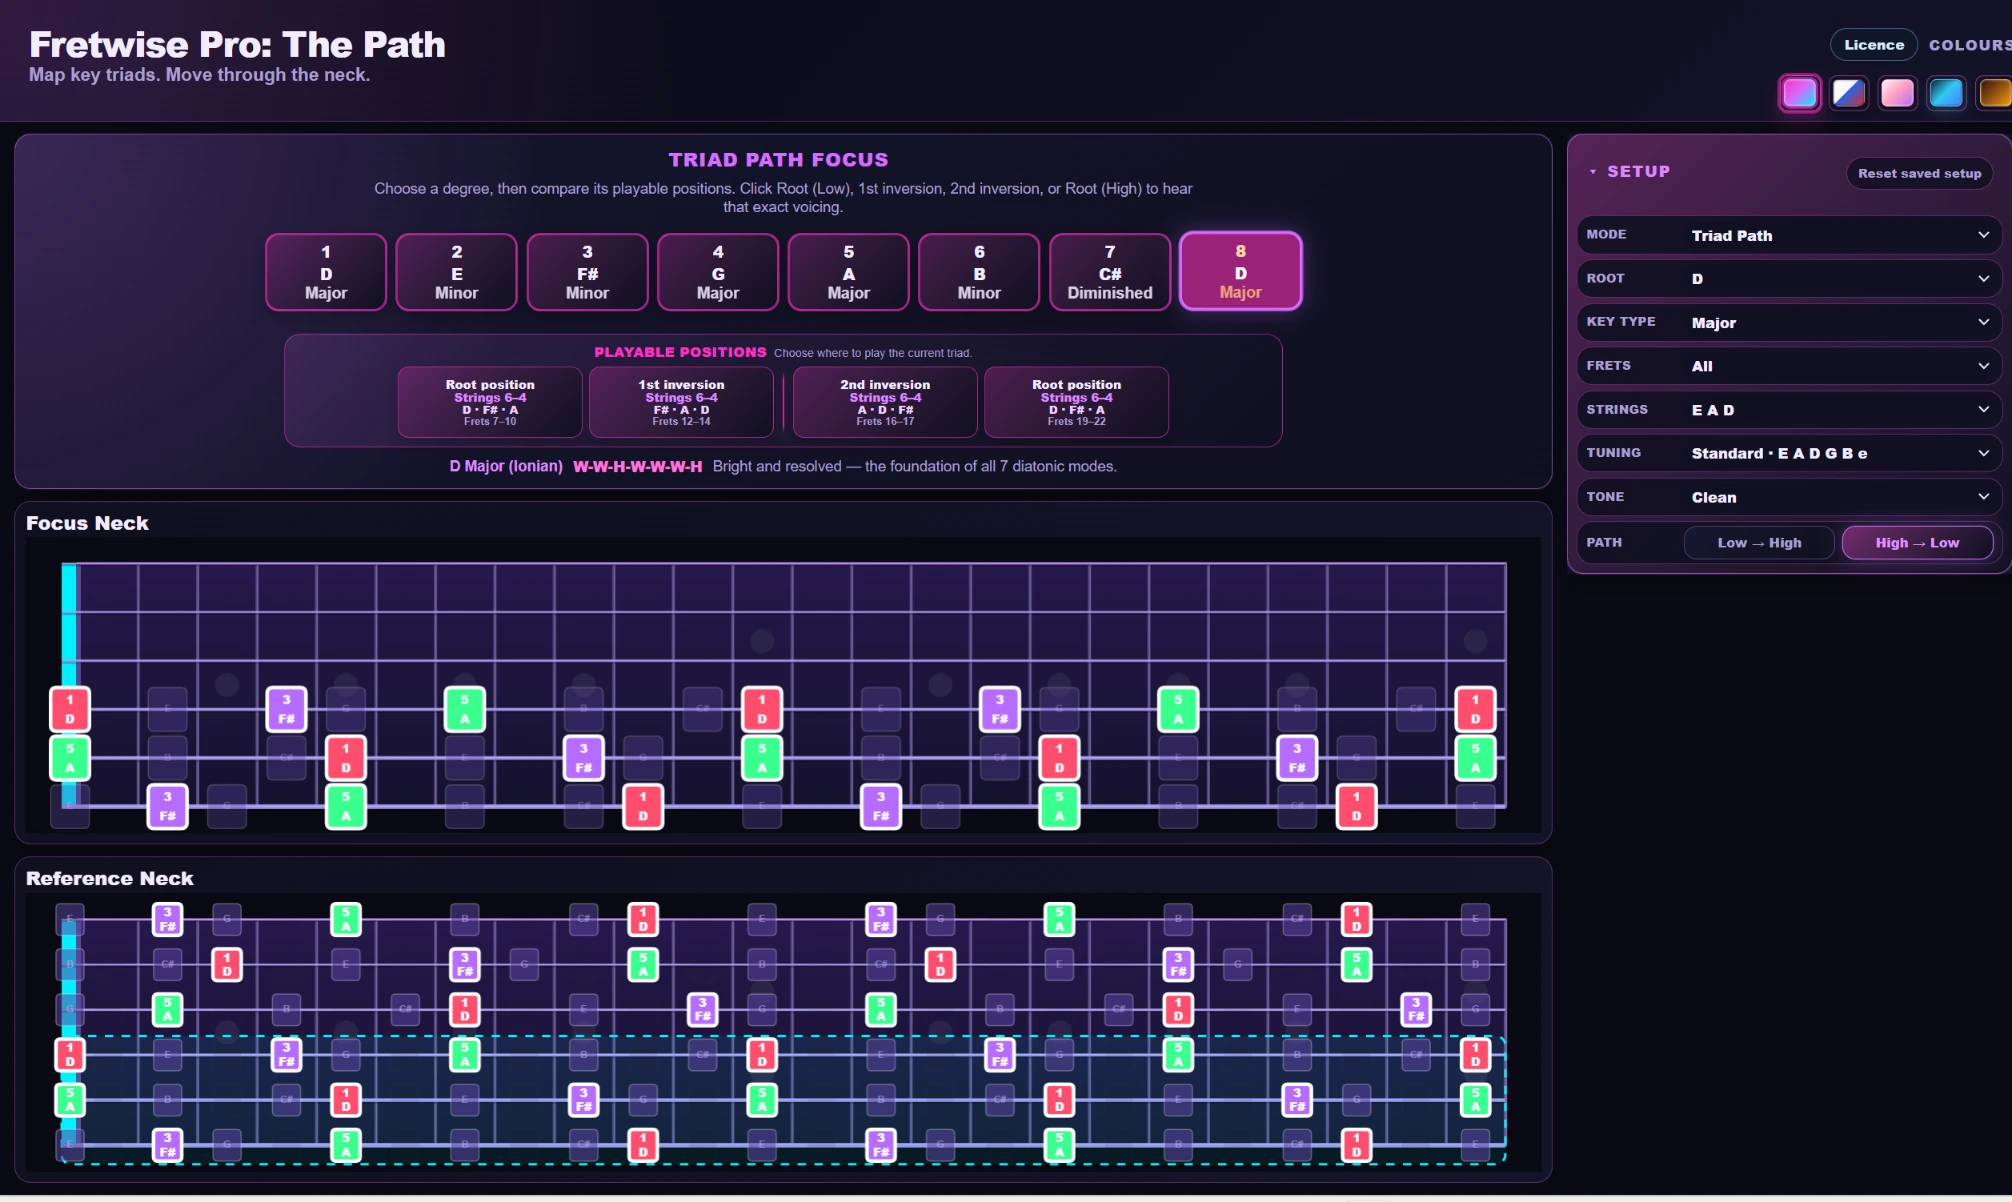
Triad Path strips the problem down to one scale degree at a time. It is manual by design: you choose the degree and the playable triad position you want to study.
What it does
Shows the selected diatonic degree and the available Root Low, 1st Inversion, 2nd Inversion, and High Root positions that fit the current fret and string constraints.
What you learn
That I, ii, iii, IV, V, vi, and vii° are functions you can play in multiple inversions instead of one fixed shape.
Why it matters
Knowing several inversions gives you choices. Those choices are the foundation for smoother progressions and voice leading.
How to use it
- Choose Triad Path and select the key, fret range, string group, tuning, and Tone.
- Select a degree from 1 through 7.
- Review the chord name, quality, and 1-3-5 role colours.
- Choose Root Low, 1st Inversion, 2nd Inversion, or High Root. A position marked Not in range is intentionally unavailable under the current fret/string limits.
- Click a degree or playable position to hear the full triad. Triad Path does not use automatic full-path playback in version 1.
- Change fret ranges and string groups to see which inversions remain physically available.
6. Scale Map
See the scale tones that surround your chord route.
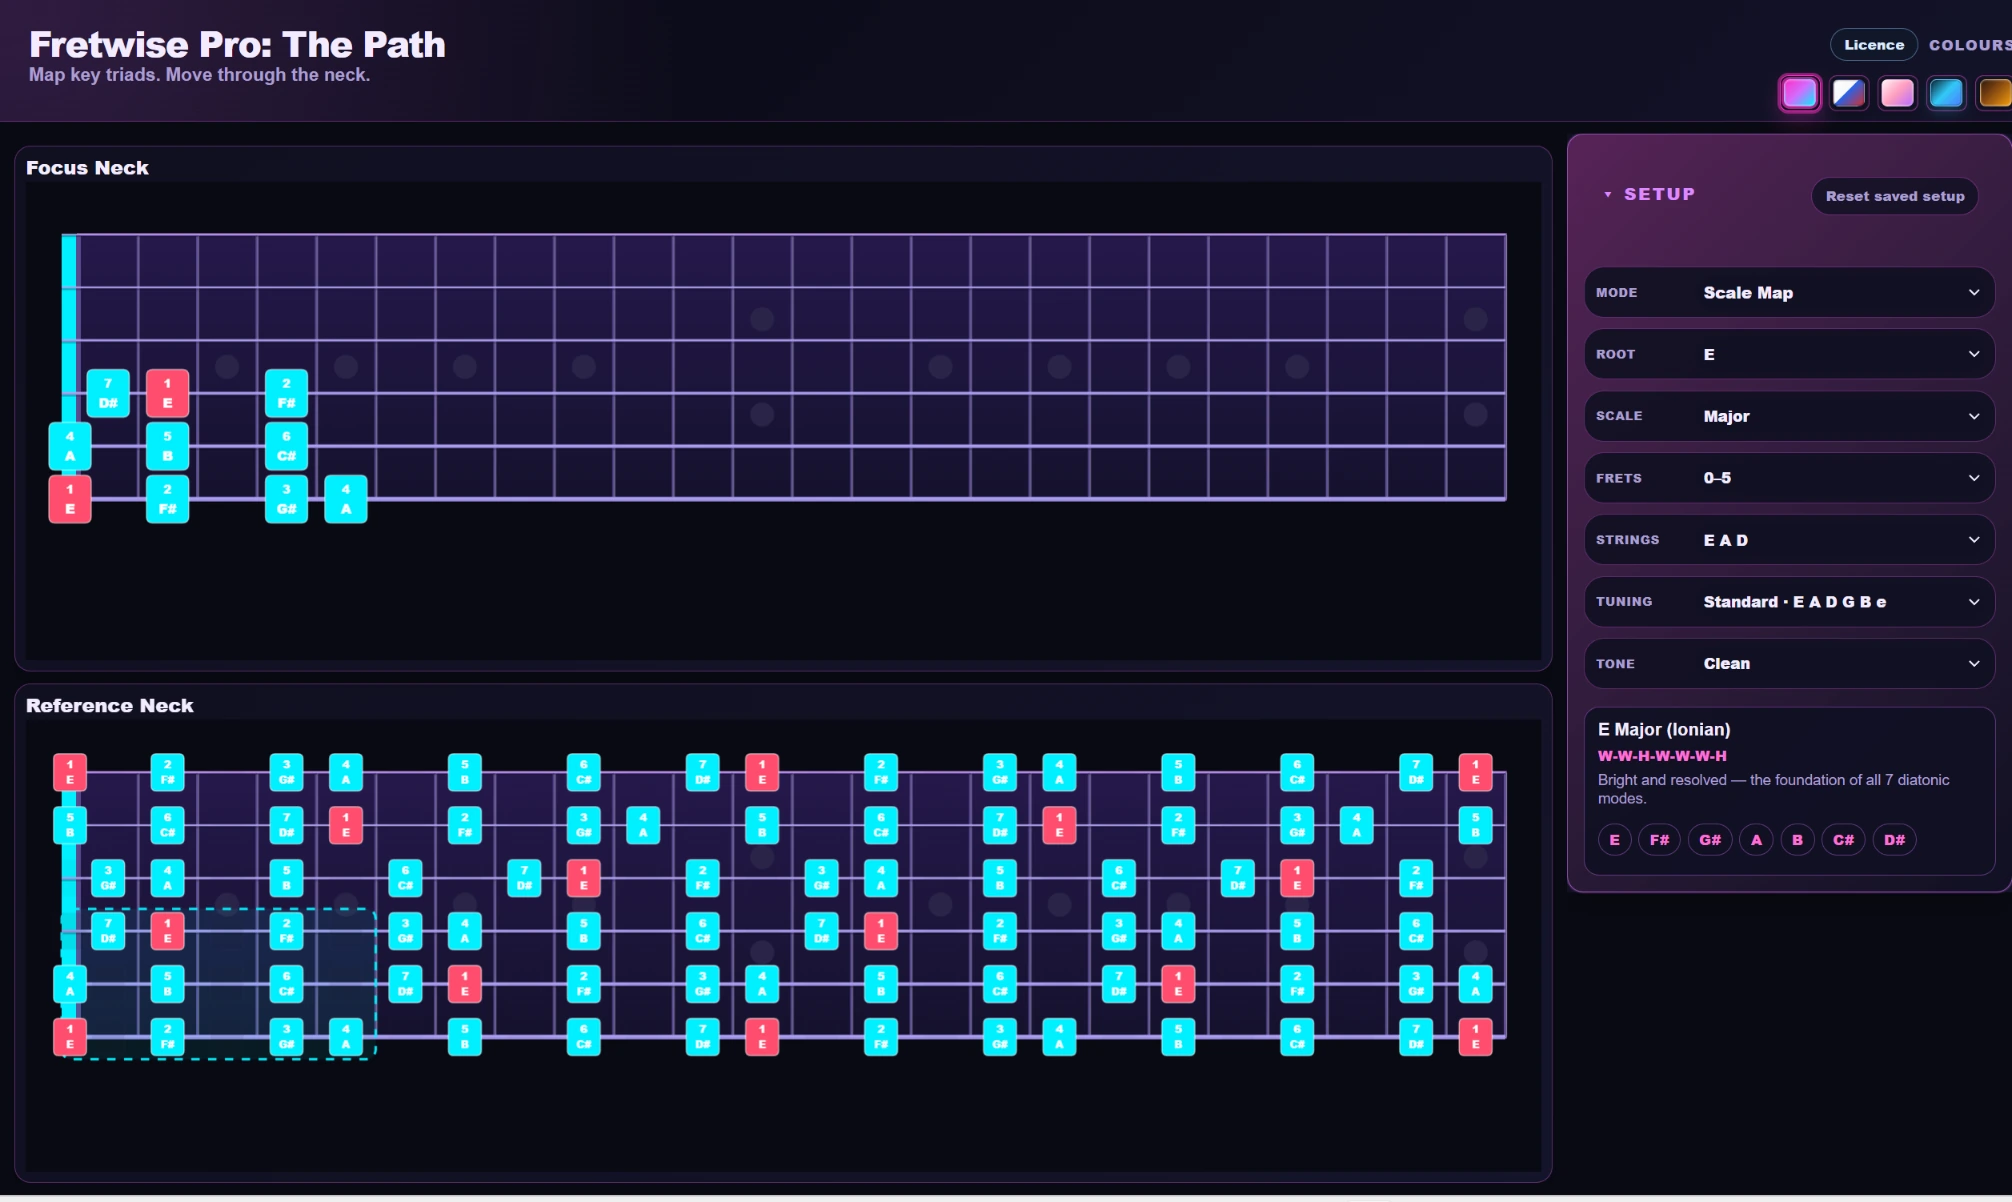
Scale Map shows the notes of the selected scale across the fretboard area you choose.
What it does
Maps the current scale across the selected fret range, strings, and tuning.
What you learn
Where the scale degrees sit around the chord shapes you are already using.
Why it matters
Chords, fills, melodies, and improvisation come from the same note environment. Scale Map helps you connect those ideas instead of learning a scale as a disconnected box.
How to use it
- Choose Scale Map.
- Select the root, scale/key type, fret range, string group, and tuning.
- Use the highlighted notes to locate the available scale tones in that area.
- Click notes to audition them and use the scale/arpeggio playback control when it is useful for hearing the note set.
- Compare the scale map with Position Path or Chord Tones so you can see which notes are structural chord tones and which are neighbouring scale tones.
7. Chord Tones
Understand what each chord is made of.
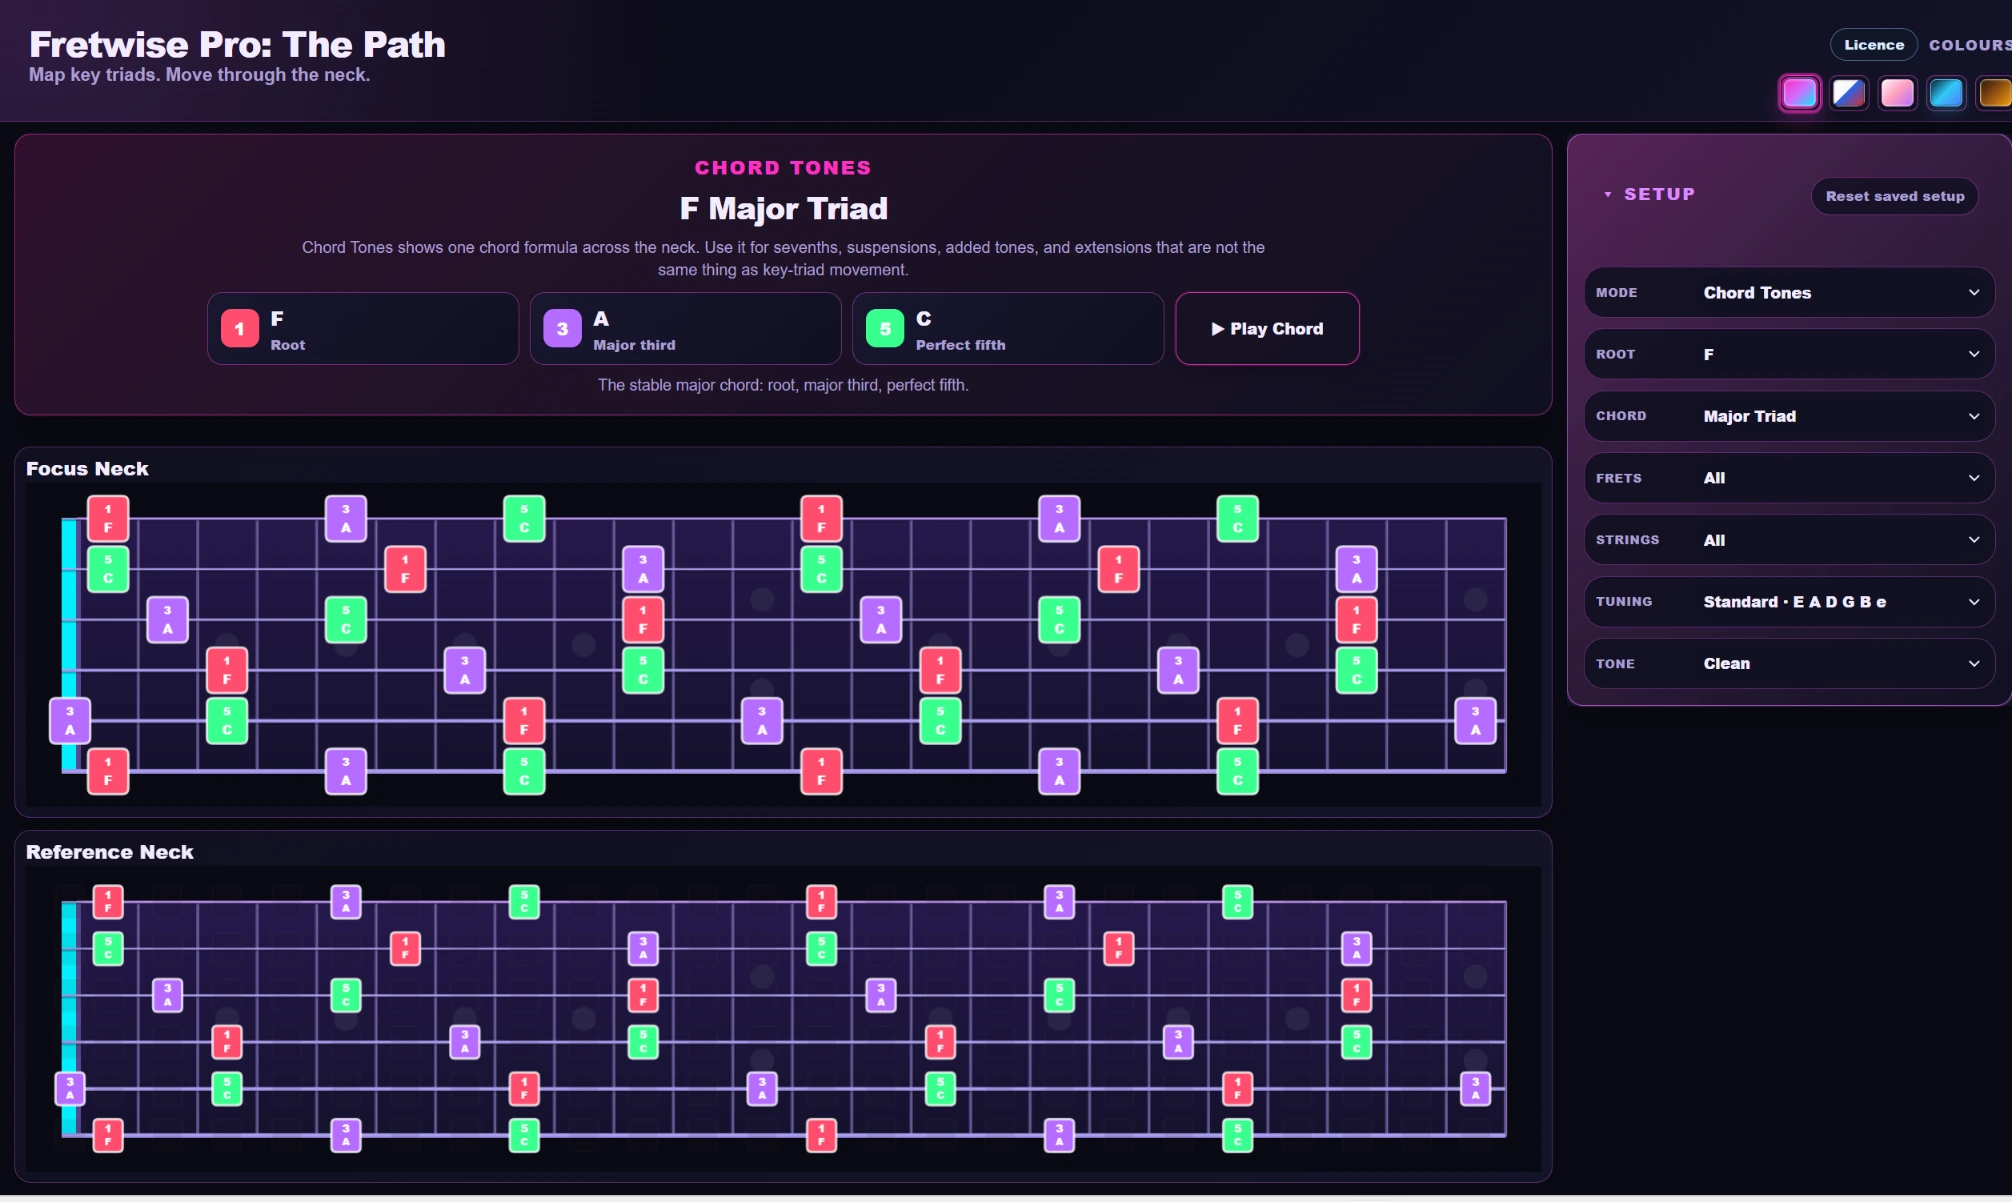
Chord Tones focuses on one chord formula at a time and maps its tones across the selected fretboard area.
What it does
Displays the chord formula - root, third, fifth, seventh, and available extensions depending on the selected chord type - and shows where those tones occur in range.
What you learn
Which notes create the identity and colour of the chord, and where those notes live on the neck.
Why it matters
When you know the chord tones, you can target notes deliberately for rhythm parts, fills, melody, and improvisation instead of guessing from a scale shape.
How to use it
- Choose Chord Tones.
- Select the root, chord type, fret range, strings, tuning, and Tone.
- Read the formula tiles and compare the root, third, fifth, seventh, and extension roles shown for that chord.
- Use Play Chord to hear the complete chord while you study where its formula tones appear on the neck.
8. Key Triads reference
Keep the chord family of the key in view.
Key Triads is a theory/reference view of the seven diatonic triads in the current key rather than a separate route-training workflow.
What it does
Shows the chord family and quality attached to each scale degree.
What you learn
The relationship between degree numbers, chord names, and chord qualities inside a key.
Why it matters
The degree number is the reusable piece of information. Once you understand the function, the same relationships transfer to every key.
How to use it
- Choose a key and review degrees I through vii°.
- Use the reference alongside Position Path and Triad Path when you need to connect a degree number to its chord name and quality.
- Return to the movement modes when you want to practise those functions physically on the neck.
9. Ear Trainer
Hear chord function instead of relying only on the screen.
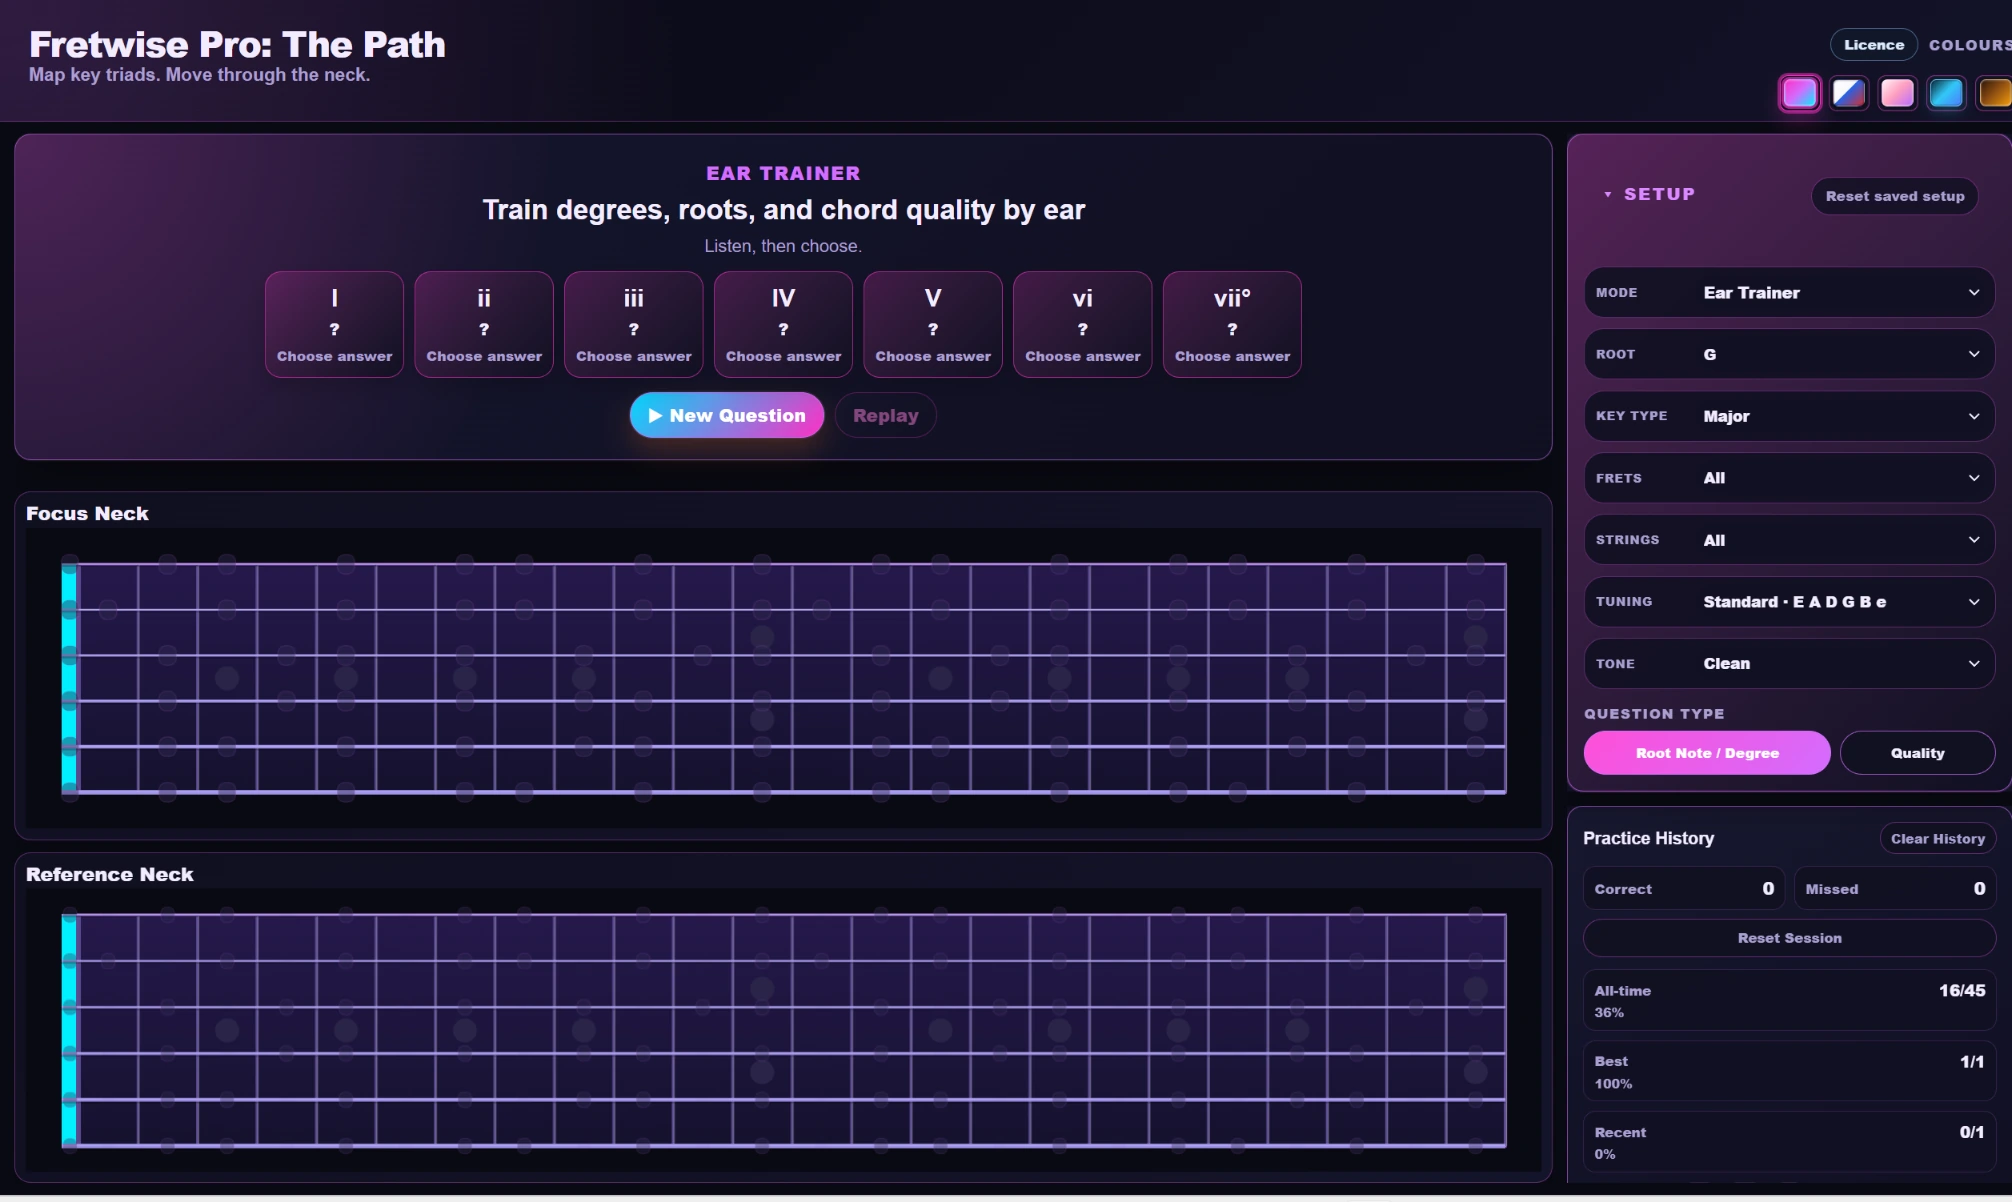
Ear Trainer asks you to listen first and identify what you heard. The final version 1 question types are Root Note / Degree and Quality.
What it does
Plays a hidden triad and asks you to identify either its root/degree or its chord quality.
What you learn
The sound of where a chord sits in the key and the sound of major, minor, or diminished quality.
Why it matters
A connected neck should eventually be audible as well as visible. Ear training helps the route become musical information instead of only a visual pattern.
How to use it
- Choose Ear Trainer.
- Select Root Note / Degree or Quality.
- Start a new question, listen, and choose an answer.
- Use Replay when you need to hear the hidden triad again.
- Review your score and Practice History to see which degrees or question types need more work.
- Reset the score when you want to begin a fresh session.
10. Progression Trainer
Put the route into time and make it behave like music.
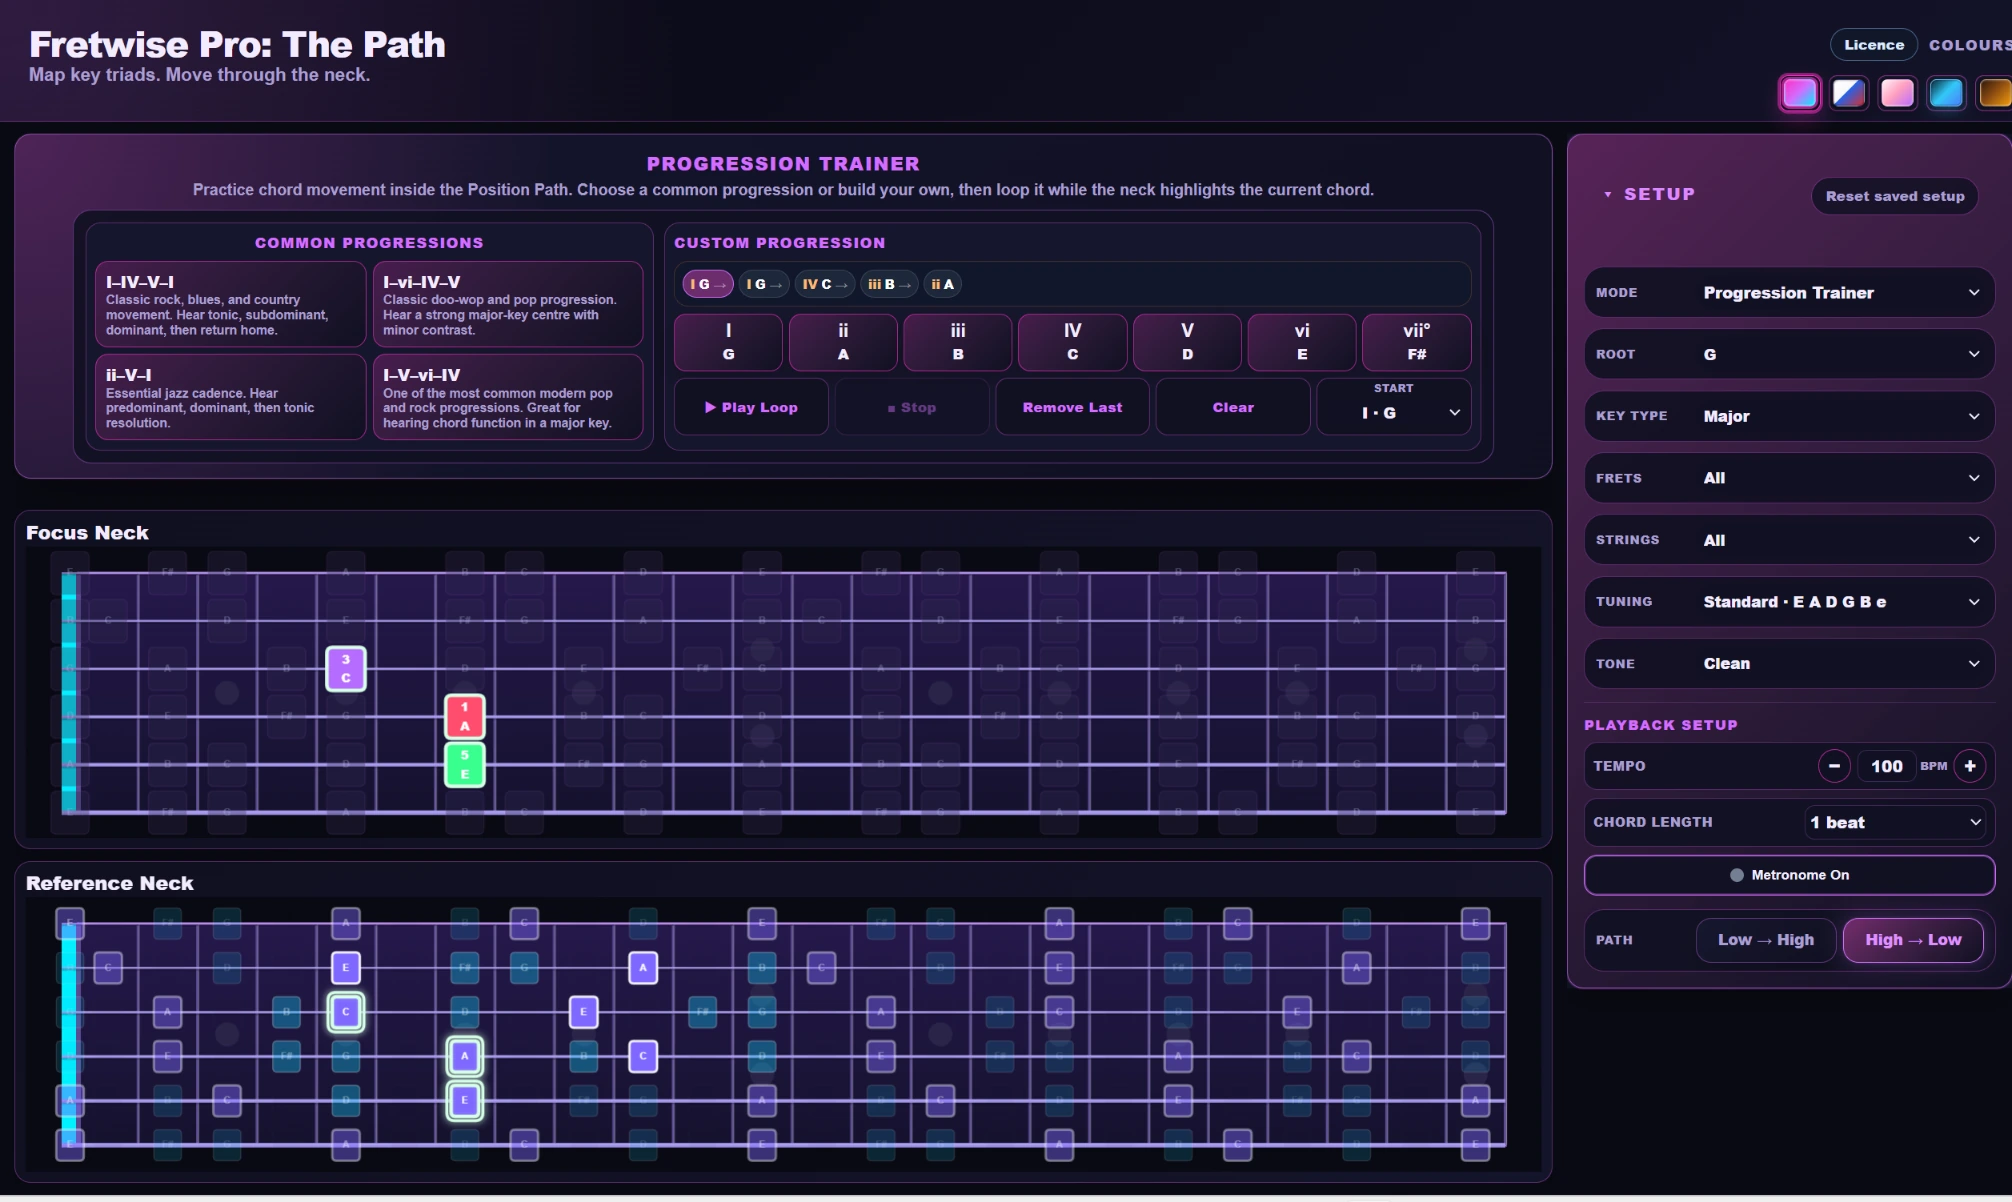
Progression Trainer loops common or custom chord progressions using playable Position Path context.
What it does
Loops curated common progressions or a custom sequence while highlighting the current chord. Setup includes BPM, chord length, metronome, direction, and route context.
What you learn
How to move between the route shapes at a steady musical pace instead of treating them as isolated diagrams.
Why it matters
Knowing the shapes is only the first step. Progression Trainer turns that knowledge into timing, transitions, and usable harmonic movement.
How to use it
- Choose Progression Trainer.
- Select a Common Progression or build a Custom Progression from scale degrees. A custom progression can begin on any degree.
- Set BPM, chord length, metronome, path direction, and the Position Path route context you want to practise.
- Select Play Loop. The current chord is highlighted as the progression advances.
- Use Stop when you are finished or when you want to make a deliberate setup change.
- Increase BPM only after you can make the transitions cleanly at the current speed.
11. Route Drill
Prove that you know the route when the next answer is not obvious.
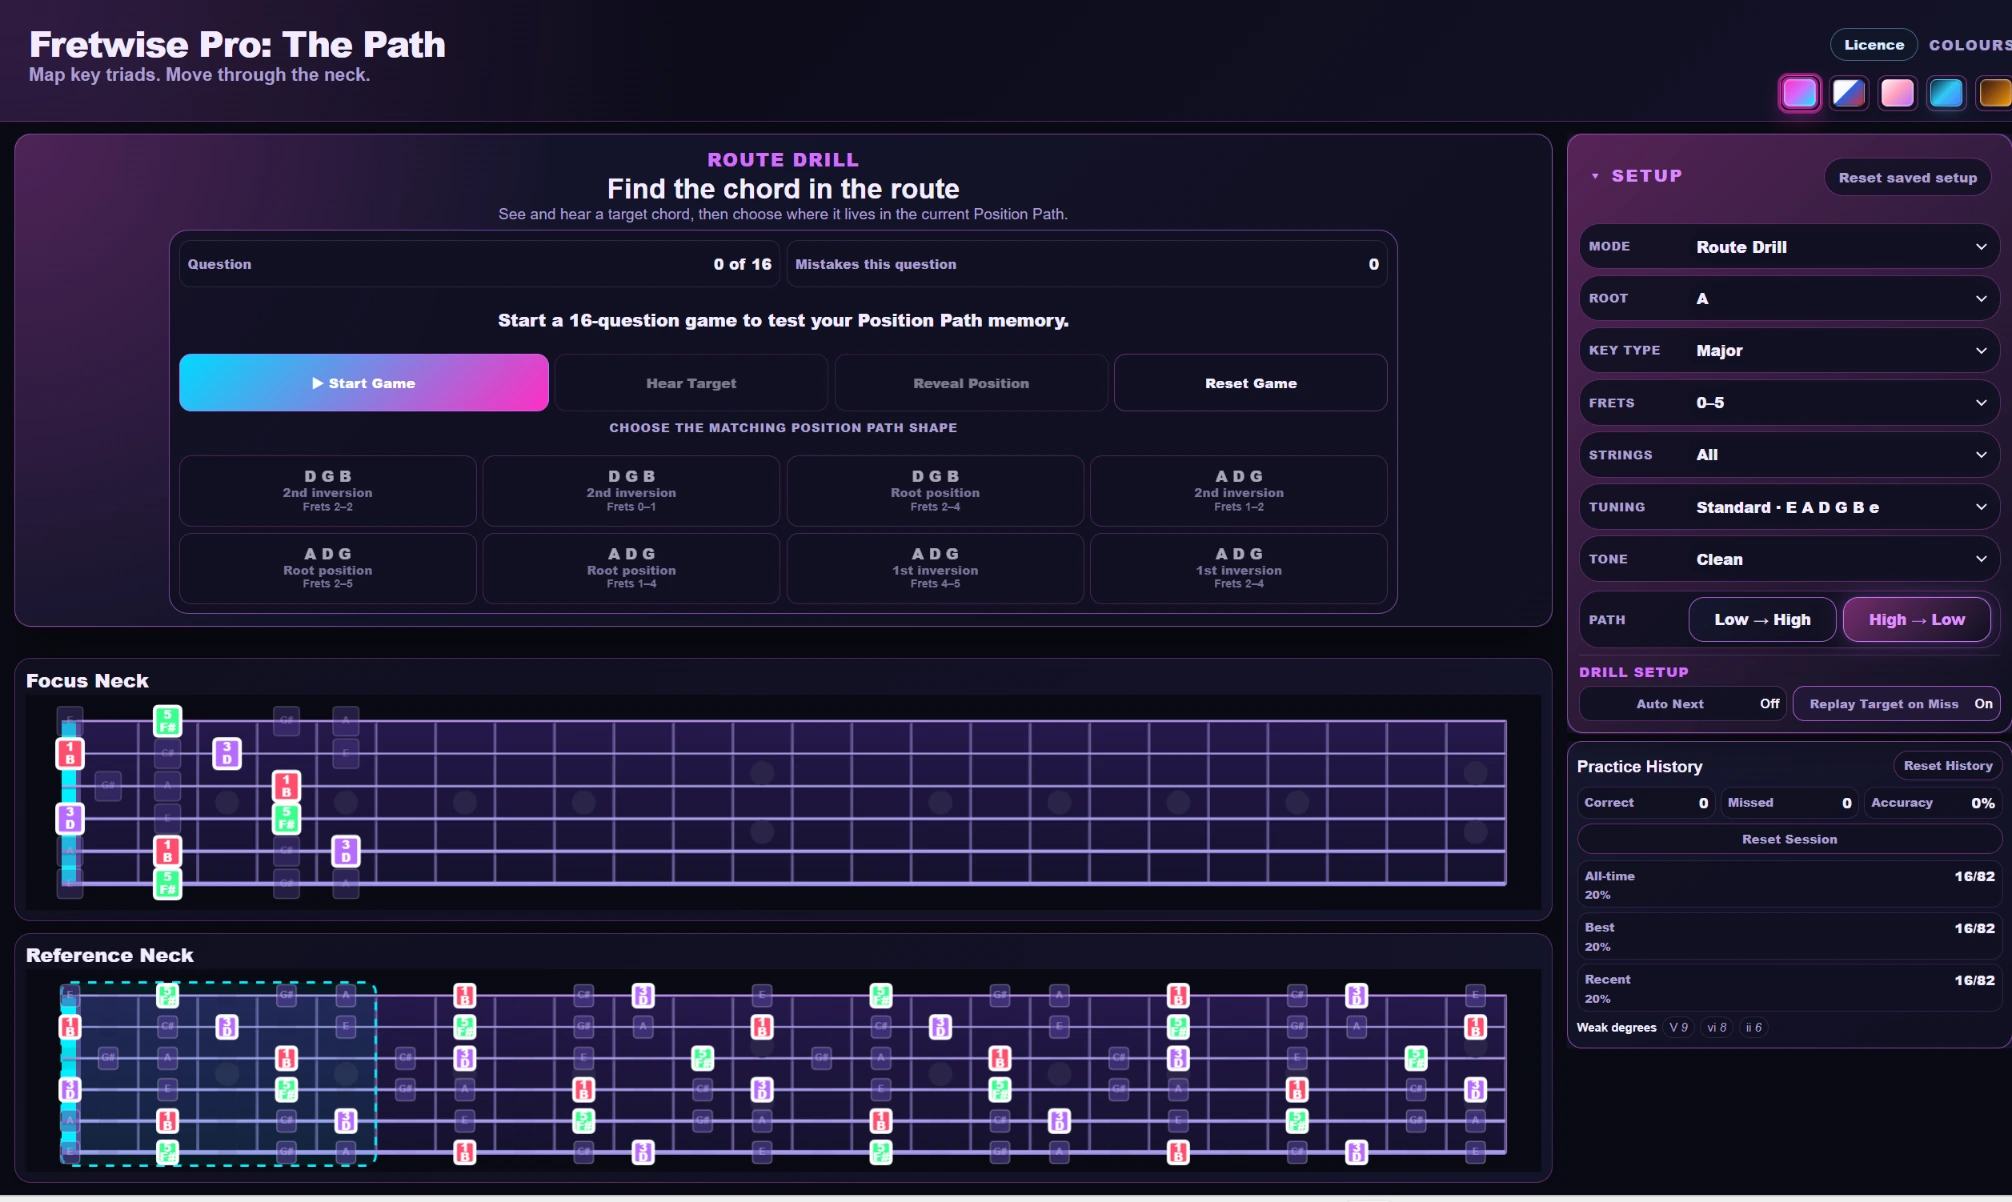
Route Drill turns the selected route into a randomized 16-question recall game.
What it does
Pulls route steps out of order and tracks correct answers, misses, accuracy, and weak degrees.
What you learn
To retrieve the location of a route chord directly instead of remembering only what comes next in a sequence.
Why it matters
Sequential memory can create the illusion of mastery. Random recall shows whether the fretboard information is actually available on demand.
How to use it
- Create or select the Position Path route you want to test.
- Open Route Drill.
- Answer each randomized route question without relying on the previous step.
- Reveal/check the answer when needed and continue through the session.
- Review accuracy and weak degrees in Practice History.
- Return to Position Path to practise weak steps, then run the drill again.
12. Voice-Leading Trainer
Choose the next inversion that moves the least.
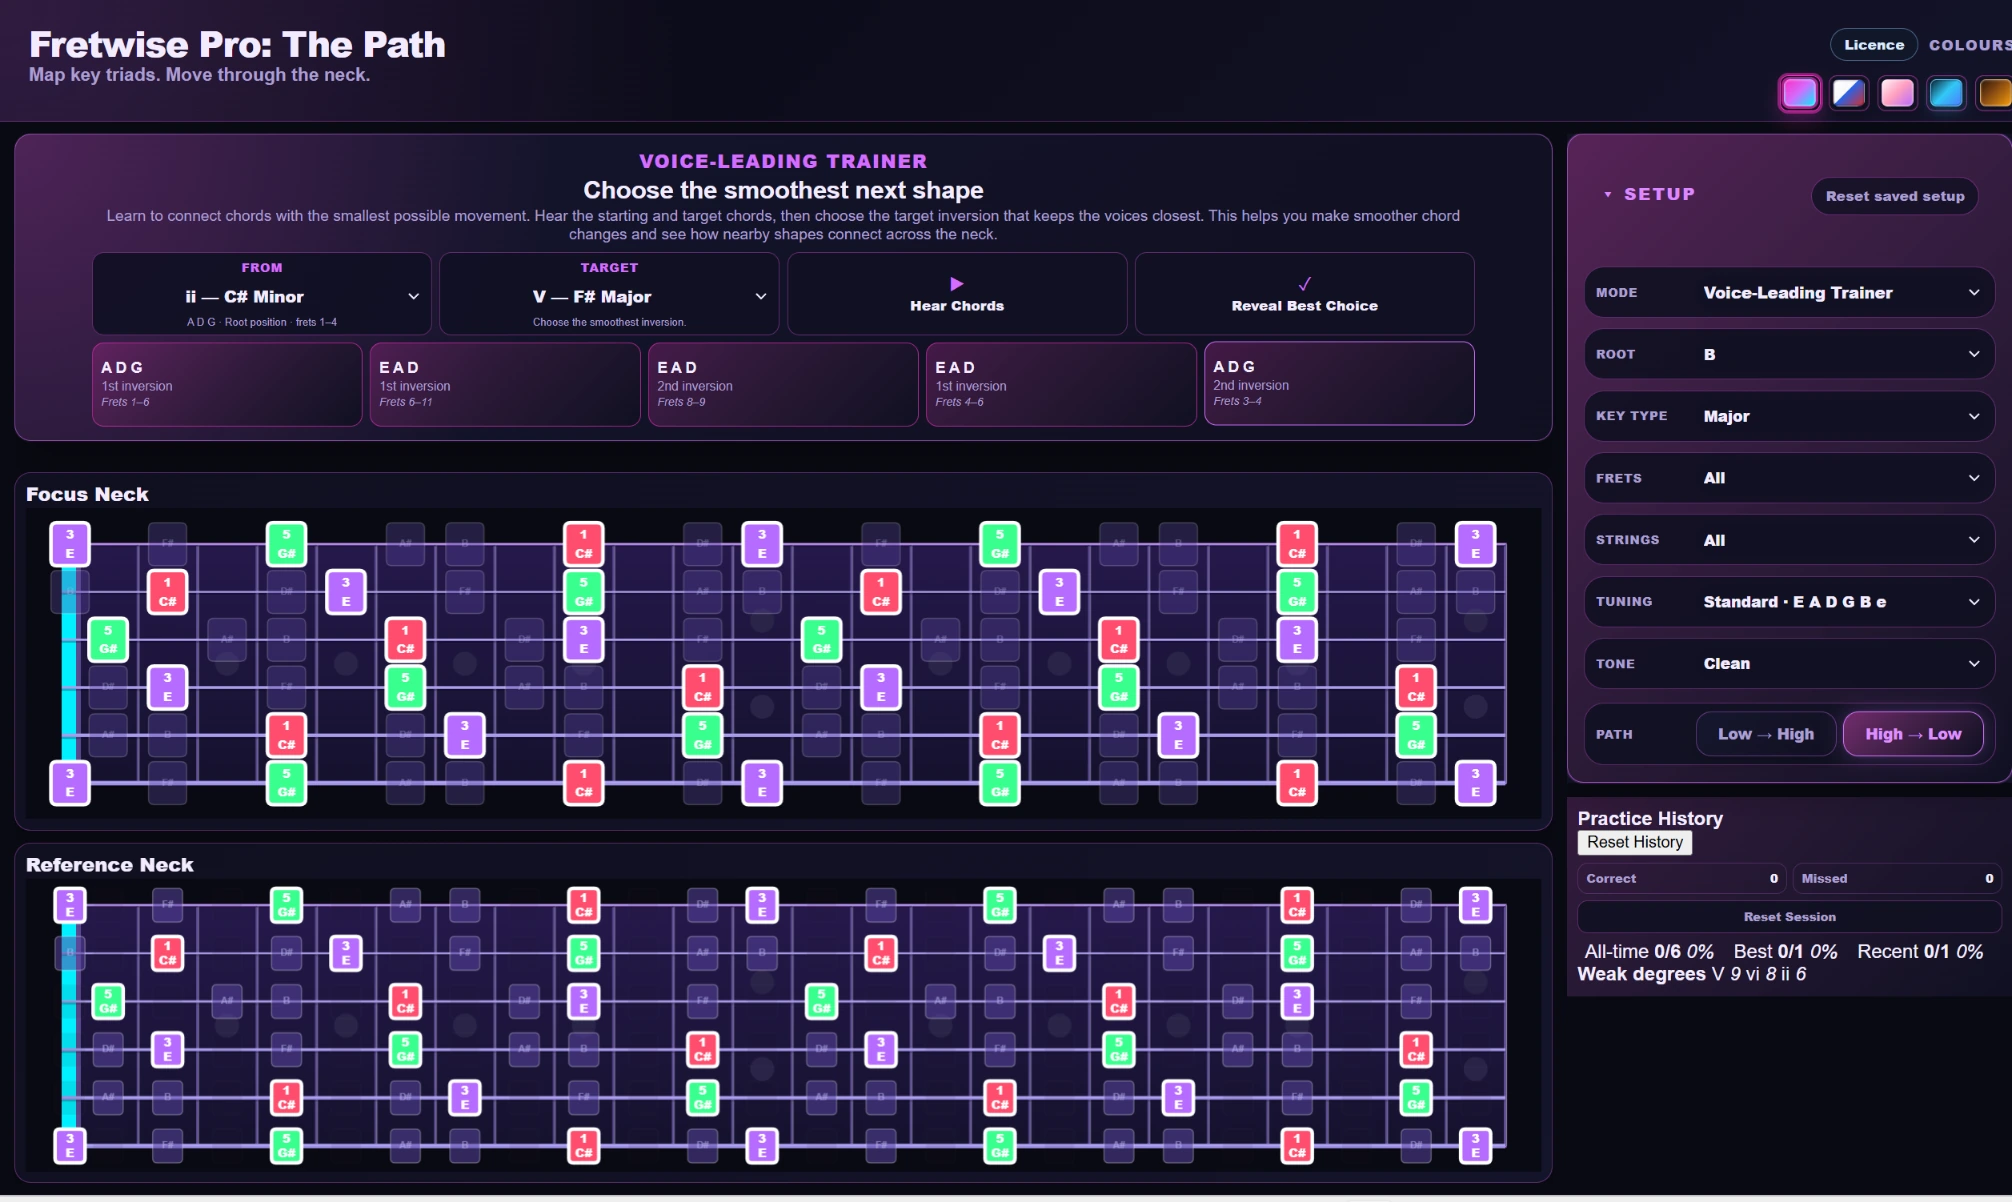
Voice-Leading Trainer compares inversion choices by note movement and common tones so you can practise smooth chord-to-chord connection.
What it does
Lets you choose a From degree and Target degree, hear the chords, compare randomized target candidates, and reveal the best voice-leading choice.
What you learn
How common tones stay put and how small interval movements create smoother chord changes.
Why it matters
Good fretboard movement is not only about finding a correct chord. It is about finding a musically efficient next version of that chord.
How to use it
- Choose Voice-Leading Trainer.
- Set the From and Target degrees.
- Use Play Chords to hear the relationship.
- Compare the candidate target shapes and choose the one you think uses the least total movement.
- Use Reveal Best Choice to check the result and study the movement/common-tone explanation.
- Because candidate order is randomized, do not rely on the best answer appearing in the same position.
- Use Practice History to identify weak target degrees.
13. Chromatic Guitar Tuner
Tune by pitch and reinforce your ear with reference strings.
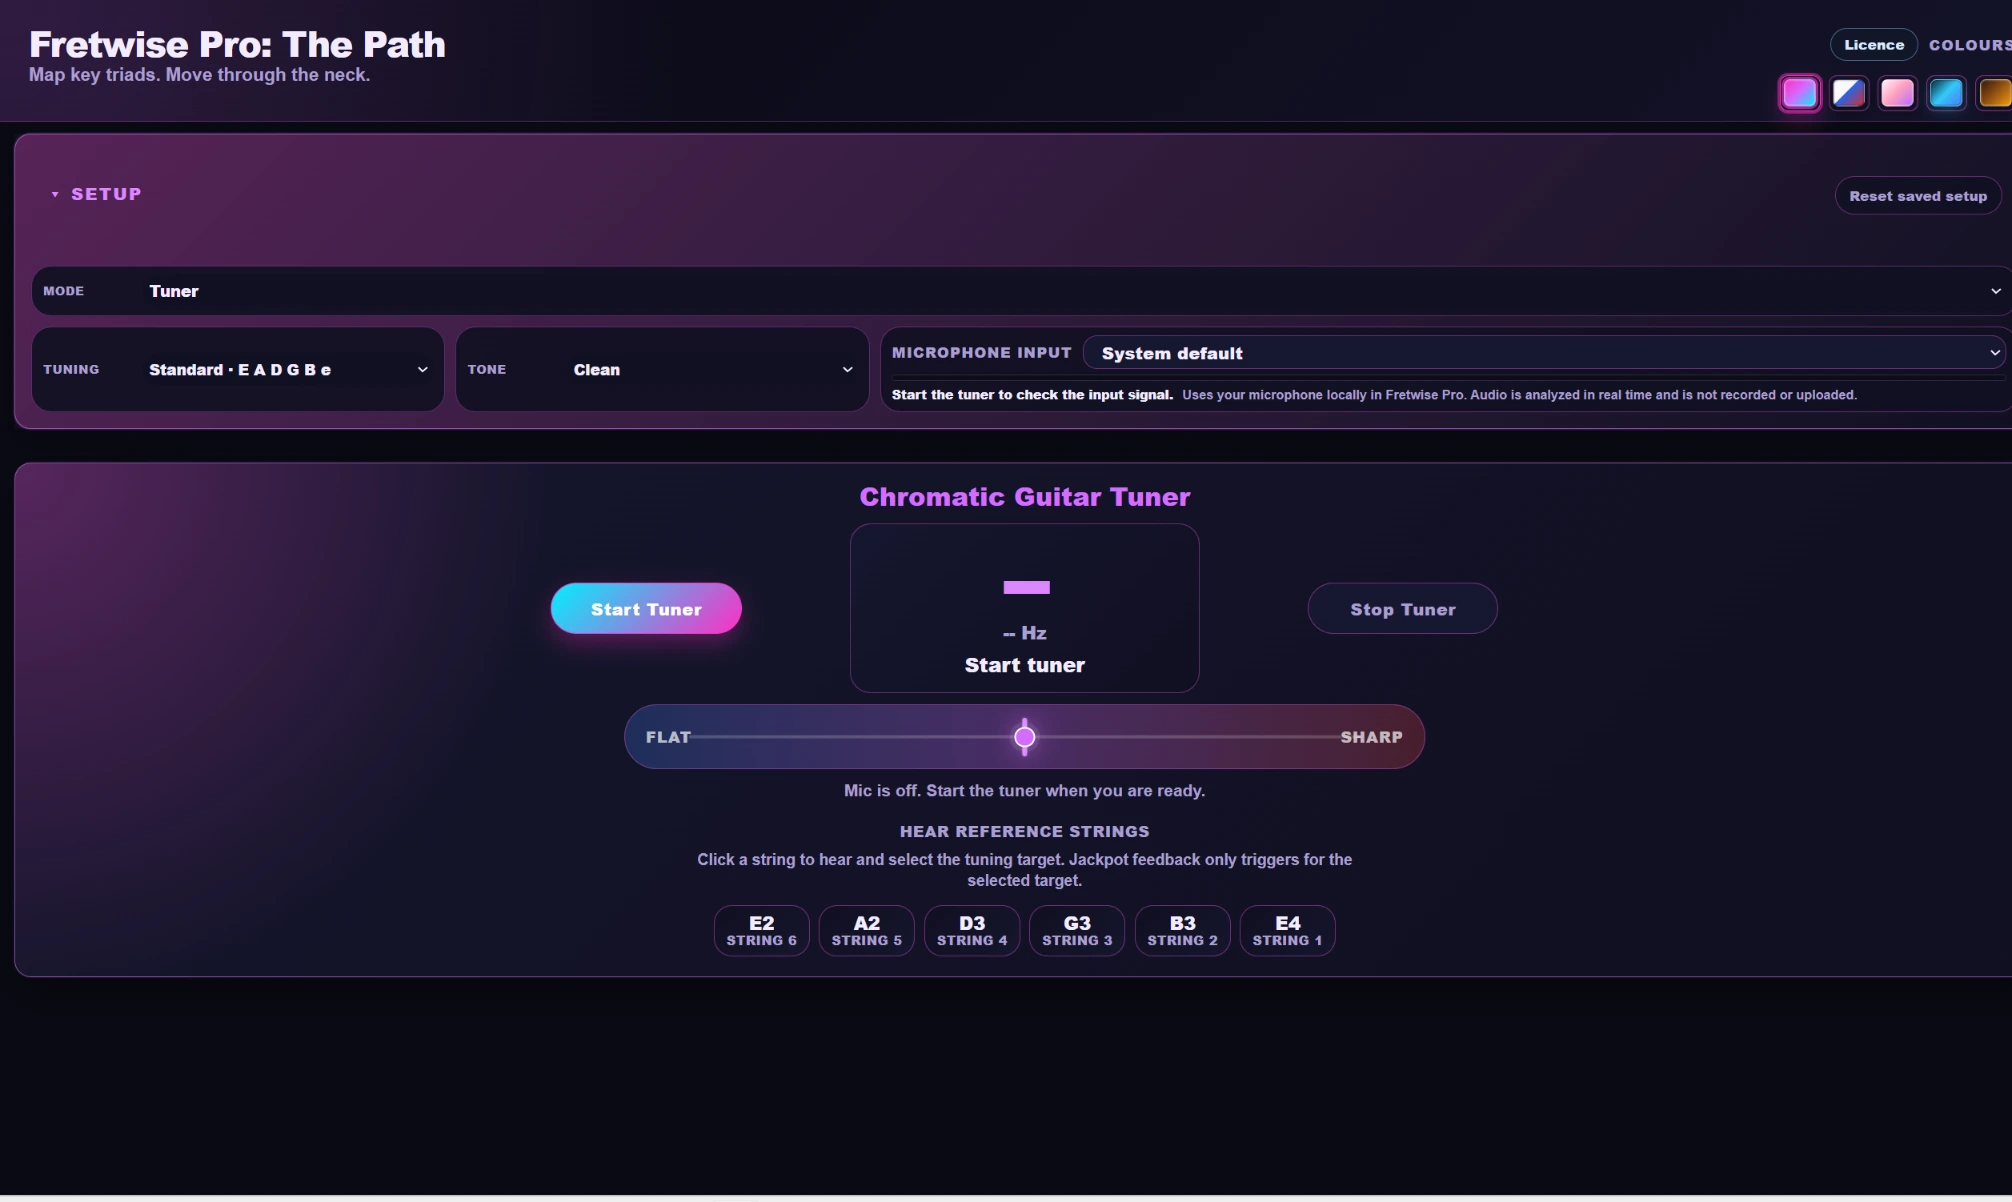
The tuner analyzes microphone input locally on your computer and also provides standard guitar-string reference tones for ear tuning.
What it does
Detects the played note, shows how far it is from the target pitch, and gives a centred in-tune indication. Standard string buttons let you hear reference pitches.
What you learn
To recognize when a string is flat, sharp, or centred - and, with the reference buttons, to practise matching pitch by ear.
Why it matters
Every fretboard, ear-training, and chord exercise depends on the guitar actually being in tune.
How to use it
- Choose Tuner and select Start Tuner.
- Allow microphone access if your operating system asks. Select the appropriate input device if more than one is available.
- Play one string clearly and let it ring while muting the other strings.
- Adjust the tuning peg until the pitch indicator reaches the centre/in-tune state.
- Use a standard-string reference button when you want to hear the target pitch and tune by ear. Microphone analysis resumes after the reference tone finishes.
- Select Stop Tuner when finished.
14. Tunings and custom tunings
Keep the fretboard map correct when your open strings change.
Fretwise includes common alternate tunings and lets you save your own six-string setup.
What it does
Changes the open-string notes used by the fretboard engine so note maps and shapes are calculated for the tuning you are actually using.
What you learn
How the same fretboard ideas move when the tuning changes.
Why it matters
A fretboard map is only useful if it matches the guitar in your hands. Custom tuning support keeps the theory and the instrument aligned.
How to use it
- Open the Tuning selector and choose a preset such as Standard, Drop D, DADGAD, Open G, Open D, Half-step down, or Whole-step down.
- For a custom setup, choose Custom and select one open note for each of the six strings.
- Name and save the custom tuning.
- Select the saved tuning whenever you want to use it.
- Delete a saved preset when you no longer need it or return the active tuning to Standard.
15. Practice History
Let mistakes tell you what to practise next.
Practice History appears in Ear Trainer, Route Drill, and Voice-Leading Trainer.
What it does
Tracks results such as correct answers, misses, accuracy, recent/best performance, and weak degrees or targets.
What you learn
Where your recall or ear is consistently weaker instead of relying on a vague sense of what felt difficult.
Why it matters
Focused practice is faster than repeating everything equally. Weak-degree information points you back to the exact part of the route that needs reinforcement.
How to use it
- Review Practice History after a trainer session.
- Identify repeated weak degrees or target choices.
- Return to Position Path or Triad Path and deliberately practise those areas.
- Run the trainer again and compare the result.
- Use Reset History only when you intentionally want to clear the locally stored history.
16. Colours and Tone
Change the presentation without changing the theory.
The visual palette and guitar playback tone can be changed independently of the musical content.
Colours
Version 1 includes White, Light Pink, Neon Pink, Blue, and Brown palettes. Neon Pink is the first-launch default, while a saved palette is respected on later launches.
Tone
Use Tone to choose the available guitar playback character, including Clean, Fuzz, and Distortion.
Why it matters
Use the palette that gives you the clearest visual separation and the tone that makes repeated listening comfortable. The underlying notes, chords, and route logic do not change.
How to use it
- Open Colours and choose the palette you prefer.
- Open Tone and choose the playback sound you prefer.
- Use your operating system, speakers/headphones, or system volume controls for overall volume.
17. Playback and keyboard controls
Use shortcuts as helpers, not as a separate workflow.
The on-screen controls are the authoritative controls for each mode. A small set of context-sensitive keyboard shortcuts is available for faster playback where relevant.
How to use it
- P plays the current chord in contexts where generic chord playback is available.
- S plays the current scale/arpeggio in contexts where scale playback is available.
- Playback shortcuts ignore held-key repeat and use audio throttling so one held key cannot flood the audio engine.
- Trainer modes and Progression Trainer use their own dedicated playback controls; use the visible buttons when a shortcut is not appropriate for the current mode.
18. Troubleshooting
Fix the common problems first.
Most issues can be narrowed down quickly by separating audio output, microphone input, licensing, and window-layout problems.
No sound
- Check your system and speaker/headphone volume and confirm the correct output device.
- Click a note or playback button once to start audio if the system has not yet allowed playback.
- Stop one active playback routine before starting another if you are troubleshooting overlapping audio.
Tuner does not detect a note
- Confirm microphone permission is allowed for Fretwise Pro.
- Select the correct input device and check the system input level.
- Play one string at a time, mute the others, and use a clean signal if you are tuning through an interface.
Licence will not activate
- Copy the complete licence key without extra spaces and confirm the computer is online.
- Confirm the key belongs to Fretwise Pro: The Path.
- If both activations are already in use, deactivate an old computer or contact support.
The window feels crowded
- Maximize the window and collapse panels that are not needed.
- Scroll when working at reduced height; the app is designed to keep controls accessible rather than forcing everything into one fixed viewport.
Saved settings or history are missing
- Preferences, custom tunings, and Practice History are stored locally in the current user profile and do not automatically sync to another computer.
19. Support
Send enough information to reproduce the problem.
Email support@fretwisepro.com for purchase, licence, installation, or app support.
How to use it
- Include the purchaser/order email address and Lemon Squeezy order number when the issue involves a purchase or licence.
- Include your Windows or macOS version and Fretwise Pro version.
- Describe exactly what you expected, what happened instead, and the steps that produced it.
- Attach a screenshot of any error message when possible.